Unboxing
In the Box
Upon receipt of DJI Mic 2, consult the In the Box list for the product and provided accessories.
DJI Mic 2 (1 TX + 1 RX)
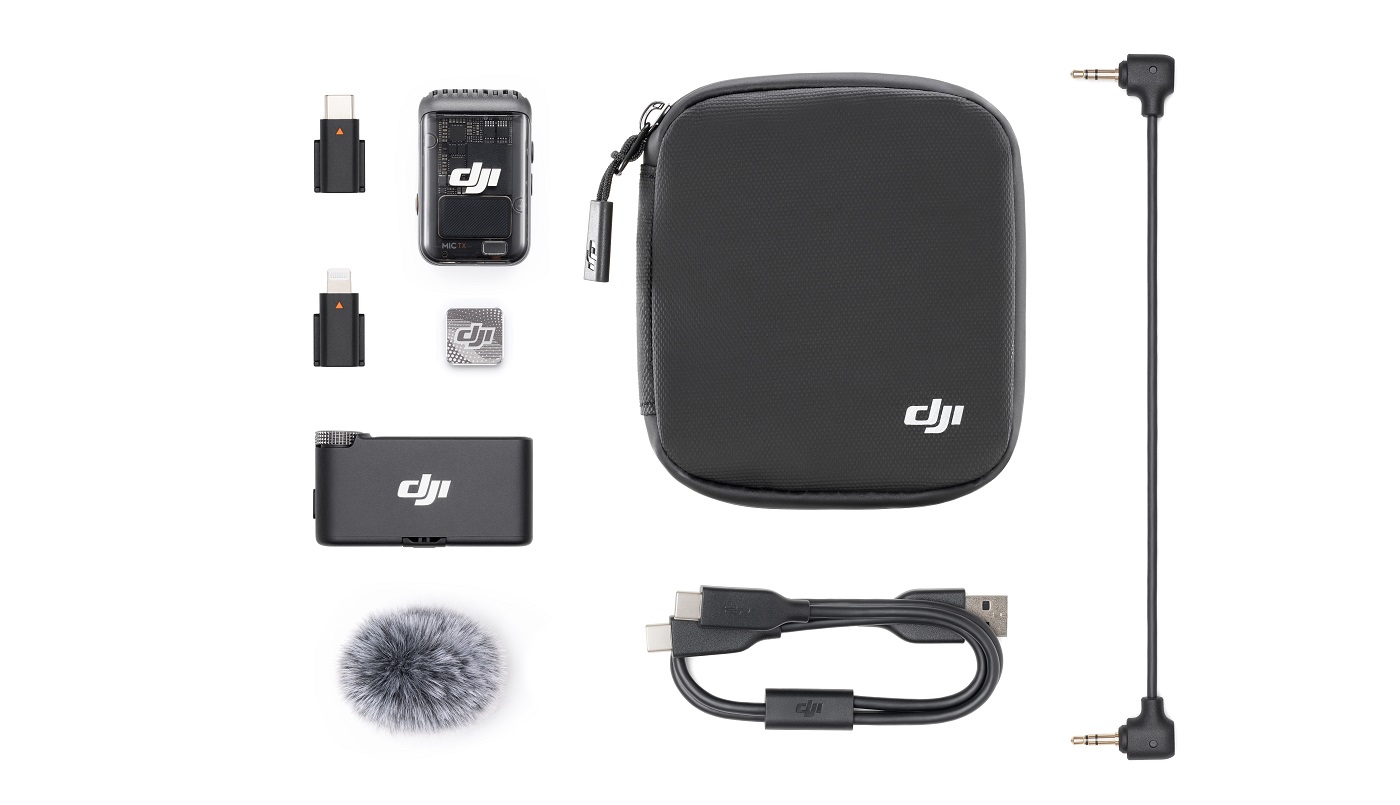
DJI Mic 2 (2 TX + 1 RX + Charging Case)

DJI Mic 2 Transmitter (Shadow Black)

DJI Mic 2 Transmitter (Pearl White)

Powering on/off the Device
Press and hold the power button on the transmitter and receiver to turn them on or off.

Language Settings
When you first use DJI Mic 2, you'll need to configure the language and time settings. Please follow the steps below to complete the setup:

Activating the Device
DJI Mic 2 is ready to use without activation. Register the Serial Number (SN) on the official DJI website and you can get a one-year warranty extension. Click here to get registered.
Charging the Device
Place the transmitter and receiver into the charging case to begin charging. It is recommended to charge the charging case using a 5V/2A charger. If you need to charge the transmitter and receiver separately, it is recommended to use a 5V/1A charger for charging.
Product Usage
Button Descriptions
Refer to this video for the functions and usage tips of each button on DJI Mic 2 transmitter and receiver.
Transmitter Indicator Descriptions
Watch this video to learn more about DJI Mic 2 Transmitter indicators:
Linking
The receiver and transmitters are already linked by default. If you need to link them again, follow the steps shown in the video:
Firmware Update
Watch this video for a step-by-step guide to updating your DJI Mic 2:
Click here to download firmware.
Advanced Operations
Supported Devices
You can use DJI Mic 2 with a range of devices, including cameras, smartphones, computers, DJI Pocket 2, Osmo Pocket 3, DJI Action 2, Osmo Action 3, Osmo Action 4, DJI OM 5, and Osmo Mobile 6.
Using with a Camera
To record and transmit audio to a camera, attach the receiver to a camera using the cold shoe on the receiver, then connect the receiver to the microphone port of the camera using the camera cable provided.
Watch the video to learn how to connect your Mic 2 with a camera.
Using with a Mobile Device
Watch this video to learn about how to connect your Mic 2 with a mobile device.
Using with a Computer
Connect the receiver to a computer via the USB-C port in order to use the transmitter as a microphone.
Watch this video to learn about how to connect your Mic 2 with a computer.
Using with Osmo Pocket 3
Watch this video to learn about how to use with Osmo Pocket 3.
Standalone Recording for Transmitters
The transmitter supports standalone recording and comes with 8 GB of storage, allowing for up to 14 hours of 48 kHz 24-bit uncompressed audio.
While recording 32-bit float* audio, the total recording time of the transmitter is 11.2 hours. Files automatically split every 23 minutes, and recording stops when storage is full.
When the transmitter is powered on, press the record button of the transmitter once to start recording and press again to stop.
The recorded audio can be exported or deleted after connecting to a computer and can be formatted via the receiver.
* New audio encoding recording method is adopted for DJI Mic 2 32-bit floating, expanding the reception range and effectively addressing overexposure issues in recordings.
For more tutorials on DJI Mic 2, you can click to check FAQs or download the user manual.